Pages

Featured Posts

Saturday, September 26, 2015

MissionMCQ - Educational MCQ Software

Firstly, sorry for not posting in a long time. Life goes on and sometimes it's hard to keep up with everything.

Anyways, I'm writing about an interesting website aptly called MissionMCQ. This service (since it packs together a Chrome app, Android app, web app, Kindle app...and so on) aims to offer everyone free MCQ papers; for all ages and subjects too.

MissionMCQ Chrome app


Signing up (free again of course) gives you the ability to sync all your papers plus the stats between various devices; for example, the paper you downloaded on the Android app will be available in the web app if you have signed into both of them. The other cool feature is the ability to share a paper and score that you have just completed on Google+ from the final screen itself. On the Android app you can share to Facebook, Messenger...etc since it brings up the native share dialog.

Share your score on the Android app

Each app brings with it a default of 3 MCQ papers by default so that you are good to go right after downloading the app, or visiting, in the case of the web app. The web app is cleverly built in that it stores all downloaded papers for offline usage so that you can answer MCQ papers even in a no-internet zone, which is quite common here in Sri Lanka ;)

Additional papers can be downloaded from the MCQStore. It is as easy as clicking on the 'Do Now' button after finding a paper you fancy. On the Chrome app and Android app, the 'get papers' option is neatly tucked away in the respective menus so that you don't have to leave the app to get yourself some new papers.

MCQStore on the Chrome app


The Chrome app however seems buggy at the moment and often fails to load all the papers after a manual syncing. On the other hand, it should be appreciated that there is localization support for Sinhala language, starting from the homepage right upto the Android app. The localization support is implemented in such a way that Sinhala letters are rendered properly even on devices that do not have official Sinhala support. There are papers from GCE A/L and O/L as well.

All the apps are built on similar UI principals so everything feels so fluid and the interface intuitive and clean. However the Android app slows down from time to time; not too much as to reduce usability.

MCQ Papers can be created using MCQMaker and uploaded to the MCQStore given that you have already signed in. Paid features include the ability to create private MCQ papers and edit already uploaded papers (you can upload a paper only once using the free account-so make sure you have no typos!). The web app takes the form of a wizard like step-by-step interface to ensure that it is easy to create MCQ papers.

Question Editor - MCQMaker

So what do y'all think about this? Don't forget to share this with your friends or leave a comment ;)

Saturday, December 29, 2012

Chromium App Launcher


What do you think about that, guys? Isn't it cool? This is not one of those 'launchers'. Ok, it is, but it's from Google! Ever downloaded web apps onto your Chrome web browser and wished they could be launched as real apps? This is the Chromium App Launcher; it shows this bubble that lists all the web apps you have installed on your Chromium. Although this feature was specifically meant for Windows 7, you can get it on Windows XP or later as well.
Wait! Did I just say 'Chromium' App Launcher and 'your Chromium'!? For those of you who don't know what Chromium is, it is the cooking version of Google Chrome and it has all the cutting edge features that will make it to the tomorrow's Google Chrome. Chromium is very similar to the Google Chrome web browser except, of course the cutting edge features and some other things which are out of the scope of this article.
One thing before downloading Chromium: it is not so stable as Google Chrome! It crashes frequently...etc. If you really want to download Chromium (which is of course FREE!) and get this launcher, continue reading!

For Windows 7
  1. Download Chromium from http://download-chromium.appspot.com/. After download, extract it somewhere!
  2. Double click on that blue version of Google Chrome icon (chrome.exe).
  3. In the address bar, type chrome://flags (or if you are already viewing this on Chromium, click here. This will get you to the place where you can enable (or disable) the cutting edge experiments. As the notice says, enabling an experiment can be dangerous and continue at your own risk!
    Click on image to zoom!
  4. Scroll down until you find the experiment "Show Chromium Apps Launcher" (or you can press Ctrl+F to search the page).
  5. Click on the 'Enable' link. I have already enabled it so I would see the 'Disable' link (as shown in the screenshot).
  6. Click on 'Relaunch Now'. Chromium will restart and you'll have the Chromium Apps Launcher button on your Windows 7 task bar!
For Windows XP or Windows Vista
  1. Follow the above instructions 1-6.
  2. The icon will most probably be shown on the Quick Launch bar. (to enable the Quick Launch, right click on the task bar > Toolbars > Quick Launch. If it is already enabled, a tick will be shown next to it.)
  3. If the icon is not visible on the Quick Launch, you will have to create the shortcut manually. Don't worry, it's easy!
Manually Creating the Shortcut
  1. Right click on the chrome.exe icon.
  2. Click on Send To > Desktop(create shortcut). A shortcut will be created on your desktop (by default named as 'Shortcut to chrome.exe'). Of course, you can manually create the shortcut anywhere you like; I chose to do it the easy way ;)
  3. Right click on the shortcut you created and select 'Properties'.
  4. The Properties dialog box will be shown. Type  --show-app-list to the text already in the 'Target' text field. You can customize this as any normal short cut (including putting another icon).
  5. Press "OK"
  6. Double Click on the shortcut if you can't stand the pressure!
  7. If you haven't already enable the Quick Launch, enable it.
  8. Drag the shortcut into the Quick Launch. Actually, you can place the shortcut anywhere! Tada!

Other features

  • You can also search the web, bookmarks, apps...etc from the search field!
  • You can set how the app is shown (in fullscreen, maximized, as a pinned tab...etc) by right clicking on the app and selecting the preferred method.
  • You can manually create the shortcut also on Windows 7!
Brought to you by http://pkjwrites.blogspot.com/

TuneUp Utilities 2013 Full

Download (Link from www.bunganajwa.com)


TuneUp Utilities 2013 Review – TuneUp Utilities has been updated to version 2013 today (from TuneUp Utilities 2012). As a reviewer, I was given a chance to get it earlier to test and to review the software ahead of public.
After using it for some time on my computer, the verdict is still the same as the previous versions. TuneUp Utilities 2013 still works wonders (and even better now) for your PC to fix, clean, and optimise it like a brand new PC.
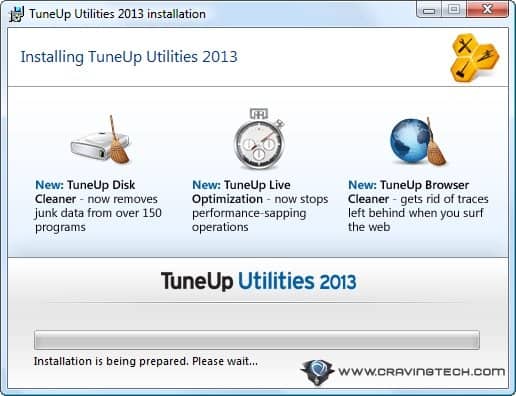
Installing TuneUp Utilities is pretty simple and straightforward. While the files are being installed, you can take a quick glance of the new features in TuneUp Utilities 2013.
TuneUp Utilities 2013 installation
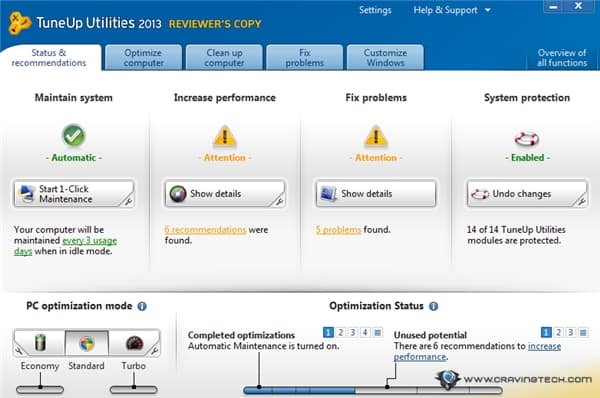
The Dashboard gives you a quick overview of the health status of your Windows PC (and a quick access to all TuneUp Utilities 2013 handy tools):
TuneUp Utiltiies 2013 dashboard
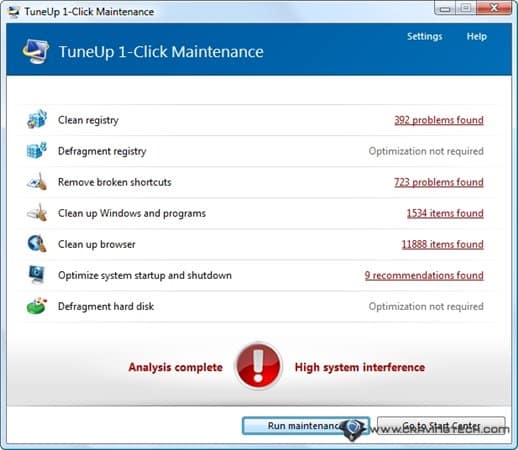
From all of the features packed within TuneUp Utilities, I have always loved the 1-Click Maintenance tool. Just by running the shortcut, TuneUp Utilities scans my computer inside out, looks for problems in the registry, finds cluttered & unused files, and much more. If you think that a technology blogger and reviewer can take care of his own PC without a software, think again after looking at this report:
TuneUp 1 click maintenance
Thousands of problems were detected by TuneUp Utilities 2013 within minutes of running the scan! And hey, trust me, I do know how to take care of my Windows PC but this is madness alright. After the analysis, you can then drill down into details (such as being able to see the broken shortcuts detected in the registry and such). Though some of these detected problems may not affect the performance of your PC directly, most of them do.
TuneUp 2013 fixing problems
Cleaning happens automatically once you agree to follow all of TuneUp recommendations or you can also pick specific recommendations that you want to apply (for example, I could choose not to let TuneUp Utilities 2013 messed up with my Windows visual settings).
TuneUp Utilities 2013 makes it clear on every recommendation so you can read what it recommends and you can then decide whether to follow it or not. I find the description is quite clear and not too technical, so both techies and non-techies can follow and make the decisions clearly.

Sunday, November 4, 2012

Let's root your Xperia X8


1. First Download " SuperOneClick " software
2. Then Enable Unknown Sources in Your phone (Settings\Application\Unknown Sources)
3. Then Enable USB debugging (Settings\Application\Development\ USB debugging)
4. Connect Your Phone and select Charge Phone
5. Extract SuperOneClick.zip and Run SuperOneClick.exe
6. Now press Root Button in SuperOneClick Application
7. you will see - " not successful - is your phone software higher than 2.0?"
   - click <yes> and then <success> & <test su> message
   - Reboot Xperia X8


If you are successful in ROOTING your phone - SuperUser app will be installed to your Xperia X8. 

** Next Post I'll show you how to backup your Current ROM and Install a Custom ROM

Wednesday, September 19, 2012

T20 WORLD CUP 2012

ICC World Twenty20 2012 Theme Song Local Version


ICC World Twenty20 2012 Theme Song English Version


16 teams participating in the world cup T20 2012

Group A 
England, 
India, 
Qualifier 2

Group B 
England, 
India, 
Qualifier 1

Group C 
Sri Lanka, 
South Africa,
Zimbabwe

Group D 
Pakistan, 
New Zealand, 
Bangladesh

Super Eight (S8) Groups
Group 1 -- A1, B2, C1, D2
Group 2 -- A2, B1, C2, D1.

Saturday, September 15, 2012

Sony Xperia neo L


      The Sony Xperia neo L is the latest Android smart phone that tries to strike the right balance between price and functionality. The Xperia neo L builds up on the success of the neo series, but they adds a bigger screen in this time.


The device is also not among the thinnest at 0.48 inches (12.2mm) and it feels a bit bulky, tipping the scales at 4.64 ounces (131.5g). 


Sony Xperia neo L Video Review 


Thursday, September 13, 2012

Apple iPhone 5 Official Trailer [HD]


The biggest thing to happen to iPhone since iPhone.

Creating an entirely new design meant inventing entirely new technology

When we envisioned the new iPhone, we landed on a remarkably thin and light design. But it's nearly impossible to make a device so thin and so light without sacrificing features or performance.

We could have taken the easy way out and designed something more reasonable and less remarkable. But we didn't.

If the technology didn't exist, we invented it. If a component wasn't small enough, we re-imagined it. If convention was standing in the way, we left it behind. The result is iPhone 5: the thinnest, lightest, fastest iPhone ever.

Related Posts Plugin for WordPress, Blogger...